How to monitor possums
Introduction
Set up temporary wax tag or chew card lines to monitor possum numbers. Use your results to track progress and make improvements.We recommend using wax tags or chew cards to monitor possum abundance in your Predator Free 2050 protection area.
More information on possum monitoring can be found in our Practical Guide to Trapping booklet (PDF, 6,277K) or you can talk to your Predator Free Ranger for advice.
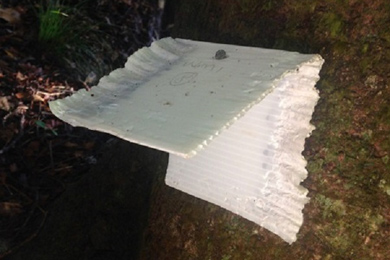
A nibbled chew card
Image: Kiwi Coast Project ©
The following advice is a simpler, community-focused version of the National Pest Control Agencies’ best-practice guide: Possum Population Monitoring (PDF, 6,488K).
How often to monitor
Use your goal and management objectives to inform monitoring frequency:
- If you only want pest data at critical times, you could monitor during bird breeding seasons or before and after control operations.
- For ongoing studies, monitor four times per year: February, May, August and November.
- For a clearer picture of fluctuations across the year, monitor once per month or every two months.
A new set of lines every time
Each time you run a possum monitoring operation, you’ll use different locations.
How many lines and devices
Number of lines depending on area size
500 ha: 10
500–700 ha: 11
700–900 ha: 12
900–1,100 ha: 13
1,100–1,300 ha: 14
1,300 ha or more: add 1 line per additional 200 ha, up to 60 lines
Number of devices per line: 10
Space between devices on each line: 20 m, and at least 200 m from the nearest monitoring line at its closest point
Pick representative habitat
Choose places that represent the range of environment types in your protection area. For example, if 50% of your area is beech forest, put 50% of your monitoring lines in beech forest.
Don’t place your lines in a grid, but do run each one straight in a single direction.
Exclude bias
Don’t run lines along places that would introduce bias, such as trap/bait lines, roads, ridgelines and streams.
The best way to avoid bias in your monitoring lines is to randomise the direction each one runs. Roll a six-sided die and look up the number below. Run the line in the most practicable of the two bearings given.
1: 285°W or 105°E
2: 315°W or 135°E
3: 345°W or 165°E
4: 15°E or 195°W
5: 45°E or 225°W
6: 75°E or 255°W
Can’t decide between the two? Roll again and pick the westerly bearing if the result is an odd number, otherwise the easterly.
Plot on a map or with software
Plot your line locations before you head out, and consider practicality of access when picking a line’s starting point. Mark your locations on a map and store them in a portable GPS device if possible.
Prepare devices
Choose between wax tags and chew cards. Both rely on bite mark identification for successful monitoring of animals.
Wax tags:
- must be purchased from suppliers
- cost more than chew cards, but are more accurate
- are triangular and have a small ball of non-toxic wax.
Chew cards:
- are cheap and easy to make, and can also be bought
- are made from white 3 mm coreflute.
How to prepare chew cards
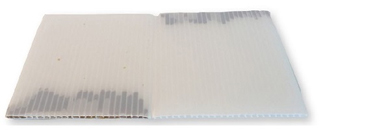
Chew card with bait applied
Image: Traps.co.nz ©
You can make chew cards from 3 mm white coreflute. Cut them to 9 x 18 cm so that the flutes are 9 cm long.
Bait with smooth peanut butter:
- Bundle 20 chew cards together to form a temporary block.
- Stand the block of cards so that the many flute openings along the long edge are facing up. Work from one end to about 5 cm in, using a paint scraper to push a tablespoon of peanut butter into the fluted ends by about 2 cm. Make sure to get an even spread.
- Flip the block over and do the same at the diagonally opposite corner.
- If your area has a high density of rats, only apply the peanut butter to one side of the card and apply rat repellent to the other.
Check the weather forecast
You’ll need seven consecutive nights of reasonable weather, with no heavy or prolonged rain. For alternative timeframes and conditions, consult Possum Population Monitoring (PDF, 6,488K).
Set-up day
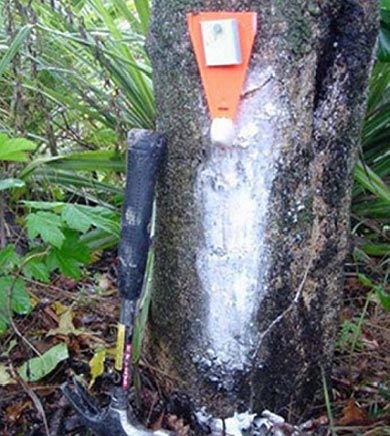
Wax tag with lure smear
Image: Possumz ©
Equipment list
- Devices in bundles of 10
- If using wax tags: luminescent trips, lure (1 part icing sugar to five parts flour)
- Waterproof marker pen
- Flagging tape (pink is a popular choice for pest lines. Don’t use orange – it’s the colour used on recreational tracks.)
- Hammer and 50-mm flathead nails
- Wooden posts if monitoring in open country
- List of start points and compass bearings for each line
- GPS preloaded with start points, map
- Compass and distance measuring tool (eg, hip chain or non-stretch cord)
- Personal gear
Mark each line and place devices
- Use your GPS device or map to locate the line’s start point.
- Follow the randomly-generated compass bearing for the line and measure the distance travelled.
- Place flagging tape along the line to make it easy and safe to follow. Label the tape with the line’s identifier.
- At 20 m, place a device and collect your measuring line:
- To place a wax tag:
- Mount a wax tag and luminescent strip on the same nail 30 cm above the ground with the wax block facing the ground. If there are no trees, use a post.
- Take a handful of lure and smear it up the trunk of the tree to make a 10 cm-wide blaze that finishes behind the tag.
- To place a chew card:
- Fold a card in half.
- Push a nail through the top layer 10 mm from the fold and through the bottom layer 5 mm from the fold. This will keep the card open at 90o..
- Hold the card in place on a tree, 30 cm above the ground with the fold at the top. If there are no trees, use a post.
- Hammer the nail down into the tree at 30o.
- Label the device clearly with the line and location identifiers.
- Mark the location on your GPS device.
- Continue until you’ve installed 10 devices.
Collection day
After seven nights, collect the devices and process them.
- Collect the flagging tape – you will set different lines next time.
- Collect the devices, making sure they're labelled correctly.
- Process and record the results (on paper, or using the Trap.NZ app):
- (P) Definite possum bite marks.
- (NT) Non-target but identifiable bite marks. Record the species too.
- (U) Unknown bite marks.
- Leave the record blank if there are no bite marks.
- (L) Lost or destroyed device.
- Store the devices for at least two years.
How to identify bite marks
Identify bite mark information from Manaaki Whenua – Landcare Research.
Interpret the data
To calculate and monitor the abundance of pests over time, you can:
- use Trap.NZ to generate indices, maps and summary tables to export and share – you can also use their app to take notes in the field
- use scientific formulae to generate indices yourself – see the National Pest Control Agencies’ Possum Population Monitoring PDFs.
Write and share a report
A formal report is a great way to release information to the public. Your results will be the star of the show, but include other information for context:
- Name of the location or block
- Size of the management area, especially if you have allowed for buffers around operational boundaries
- Control methods and start and finish dates
- Device type
- Number of lines
- Number of nights devices were deployed
- Weather information
- Names of participants (optional – get permission)
- Maps with data overlays (optional)